Create a sliding menu in Android
Use the navigation architecture component from Android Jetpack
The navigation drawer is a UI panel that shows your app’s main navigation menu. It is open when the user swipes a finger from the left edge of the screen or, when the hamburger menu icon is used from the action bar.
Firstly, start by creating a project with an empty activity.
Setup your project
Add dependencies
|
|
❗ If you have the following error
All com.android.support libraries must use the exact same version specification (mixing versions can lead to runtime crashes). Found versions 28.0.0-rc02, 27.1.1. Examples include com.android.support:animated-vector-drawable:28.0.0-rc02 and com.android.support:design:27.1.1 less… (Ctrl+F1) There are some combinations of libraries, or tools and libraries, that are incompatible, or can lead to bugs. One such incompatibility is compiling with a version of the Android support libraries that is not the latest version (or in particular, a version lower than your targetSdkVersion). Issue id: GradleCompatible.
You can solve the problem by renaming all libraries that are added by default into your dependencies with the mapping from developer.android.com to use the new AndroidX librairies.
For instance, you should do the following renaming
|
|
Add also the following properties into gradle.properties
|
|
According to the documentation, android.useAndroidX means that you want to start using AndroidX into your project.
android.enableJetifier means that you want to have tool support (from the Android Gradle plugin) to automatically convert existing third-party libraries as if they were written for AndroidX.
❗ Be careful to use classes from androidx package into generated code and into layout rather than old classes to avoid compilation errors.
Enable navigation editor
Click File/Settings, select the Experimental category in the left pane, check Enable Navigation Editor, and then restart Android Studio.
Define items for the sliding menu
Create the menu resource file by Right-Click on the res folder, then select New/Android Resource File. Fill the dialog box with drawer_items as file name and select Menu as resource type.
Add the following items into the menu file
|
|
group is an optional, invisible container for item elements. It allows you to categorize menu items so they share properties such as active state and visibility.
Define fragments used by the application
Create 4 fragments named FragmentItem[1,2,3,4], with their layout named fragment_item[1,2,3,4] by Right-Click on the res folder, then select New/Fragment/Fragment (blank). These fragments will be used as targets of menu items.
Create another fragement named FragmentMainUI with his layout named fragement_main_ui that will be the main UI of the application when no menu item will be selected.
Into each layout, put a TextView to identify them
|
|
Define navigation graph
Create a navigation graph file by Right-Click on the res folder, then select New/Android Resource File. Fill the dialog box with nav_graph as file name and select Naviguation as resource type.
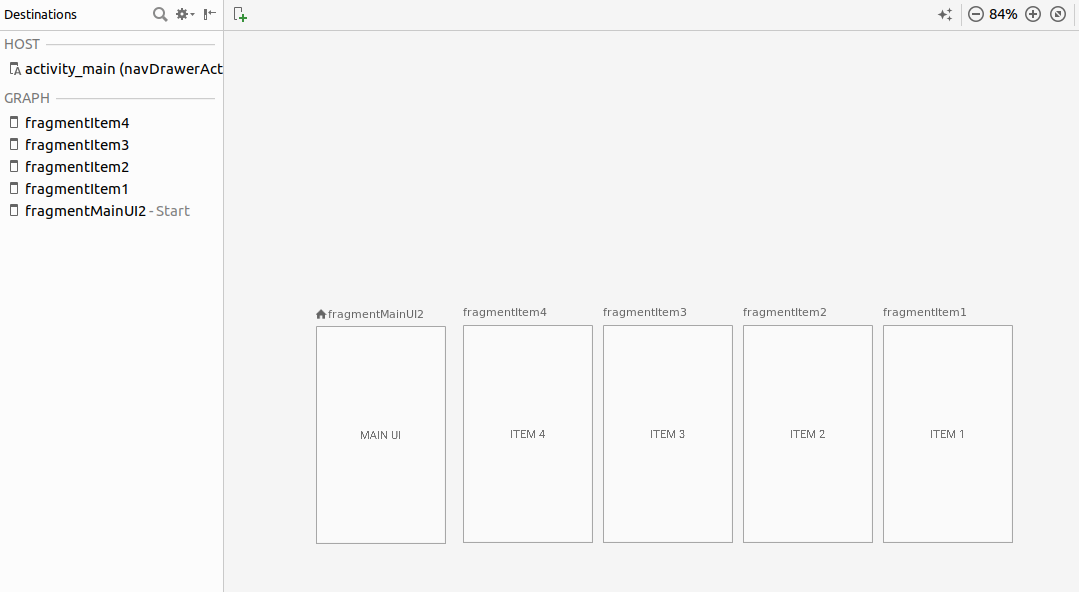
Into the graph editor, add all destinations previously created (all fragments).
Set the destination FragmentMainUI as Start destination, the navigation graph should looks like

Use a ToolBar instead of the built-in application bar
To be compliant with material design guideline, we must use ToolBar instead of using the built-in application bar to manage hamburger icon. ToolBar can be add into your layout by using
|
|
Do not forget to set your app theme to one without built-in action bar. For this, update the android:theme attribute into Manifest.xml.
|
|
To finish, set the ToolBar as the application bar into onCreate() of your MainActivity:
|
|
Define the application layout
Replace the content of activity_main.xml by the following layout.
|
|
The layout is divided into two parts, the content of the drawer that is a NavigationView and the main UI where the drawer will slide over. The main UI is composed by a ToolBar and a NavHostFragment. This last component is an empty view whereupon destinations are swapped in and out as a user navigates through your app. You must associate this component with a navigation graph by using app:navGraph attribute.
Tie destinations to menu items
You can tie destinations to the navigation drawer by using the id of the destination as the same id for the navigation drawer menu item in XML. For instance, uses id fragmentItem1 in the following way to tie Item1 menu with FragmentItem1.
drawer_items.xml must look like.
|
|
fragment_item1.xml must look like.
|
|
And nav_graph.xml must look like.
|
|
Do the same for all menus and destinations that you want to tie.
The Navigation Architecture Component includes a NavigationUI class. This class has several static methods you can use to connect menu items with navigation destinations. For example, add the following code into MainActivity class to connect items in the menu drawer to the navigation view after that you have correctly defined all ids.
|
|
Enable hamburger icon
In order to enable and show the hambuger icon, you can add setUpDrawerToggle() into MainActivity and call the method into onCreate()
|
|
ActionBarDrawerToggle is the easiest way to tie together the functionality of DrawerLayout and ActionBar to implement the recommended design for navigation drawers.